The warriors are about to come against a strange and unpredictable foe. Not quite a Chaos Dwarf, not quite a servant of the Chaos Gods, the one known as Ghazhaan the Twisted follows a path of his own, which makes him doubly dangerous.
| "The raiders had come early, while the first ore
caravans were still some miles off, and with them many of the vigilant
guards. On this day, however, the orcs didn't intend to raid the
caravans. They slipped in the gates opened by a hobgoblin advance squad,
and managed to remain relatively quiet as they headed for their target.
The majority of the dwarf warriors were either sleeping off last night's
celebrations, or were working on the new mine, several miles off. The
intruders were first detected on a wide scale when a group of goblins
after pillage burst into the Iron Hall, where a group of dwarfs were
dozing off the ale. Despite this, they were all old veterans, and
quickly roused themselves to slaughter the goblins. They were the first
defiance that faced the orcs. One party of raiders was trying to burn the stores of food, when they were set upon by a fierce party of dwarf women. The women had taken tools from the forges and weapons from their hearths, and set about defending their home. Many orcs fell as the women slew all the greenskins they could find, and it seemed that the raid would be halted in its tracks, having done fairly minor damage. The women met up with the veterans, each force supplemented by newly woken dwarfs, and a group of human traders who occupied part of the fort. In a lull in the fighting, the dwarfs moved forward on the trapped orcs, who determined to sell themselves severely. Yet the unusual cunning behind the raid did not fail here. A large mob of goblins sacrificed themselves to push a hole in the ever-swelling ranks of the dwarf defenders, followed by the remaining dozen hobgoblins. All but a few greenskins were slaughtered, along with many dwarfkind. The battle was ended when the main force of dwarfs returned from the mine, the warriors with axes and the workers with their picks and hammers. The battle was won- but the escaping orcs and goblins exacted a terrible revenge, taking not only some of the prized treasures of the clan, but something far more precious. They escaped through the hole in the dwarf lines, and managed to reach a cluster of living quarters. There they stole a dozen of the dwarf children, taking them for hostages. The greenskins escaped back to their lair, and the dwarf hold mourned the loss of their warriors and children. A few became Slayers, and disappeared. The rest returned to their labours. Eventually the lost children were forgotten, just one more unpaid grudge. The dwarfs knew that they must be dead. But one was not." |
The great empire of the Dwarfs is but a memory, albeit a strong and abiding one. The majority of the ancient dwarf halls are but lairs for foul beasts, and graves of thousands of forgotten treasure-hunters. However, a newer dwarf empire has grown steadily over the years. The Chaos Dwarfs follow the god Hashut, and seek ever to undermine all of the other powers and races of the world. It is said by some that their greatest enemy is their own kindred, the proud remnants of the dwarfs who supposedly are the only force that can defeat their dark cousins.
All dwarfs, even evil ones, are inordinately proud and do not suffer insults or defeats well. Many are the dwarfs who have become somewhat unhinged by a catastrophic loss, and taken the Slayer Oath to seek their redemption through death. This story is one of a younger dwarf, stolen from his kindred by orcs, who did not slay him, but took him for a slave.
The warriors have been working for the Hammerhall clan, which occupies a
small range of mountain fortresses in the vicinity of Karak Norn. The clan has
had problems with raiders recently, and has opened up their abandoned lower
levels to any warriors bold enough to seek their fortune there. In one skirmish,
the warriors found evidence of a previously unknown tunnel that stretches for
miles to the east. It is from here that the orcs and goblins have come.
They take this information to the dwarfs, to receive their instructions. The
mission is clear- Trace the tunnel to its source, and find out who is trying to
undermine the fortress.
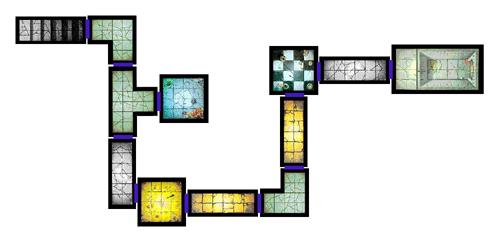
The warriors are travelling through the underground tunnel. It seems to have
been dug out to accommodate fair numbers of people, and much of it is shored up
with wood or even stone. Ventilation shafts are sunk through the earth, bringing
air and some light to the tunnels.
Unexpected Events occur on a roll of 1, as normal. However, only 'M' Events
occur. Roll on the Monster table to see what the event is. It seems that whoever
has dug the tunnel has allowed all sorts of scum to use it, so any sort of
Monster may be encountered.
If the warriors give up and roll on the Escape Table, it is assumed that they
find their way out (if they survive) through a ventilation shaft. They emerge
1D6 weeks away from their patrons, and must either travel back, or go to another
settlement, and resume a 'normal' career. If they return to the Hammerhall
settlement, they must try the mission again.
This room is well lit, in contrast to the rest of the tunnel so far. It is
dominated by a large pit, which has two large doors set in the far end. There is
a thin walkway around the edge of the pit, and a trapdoor of some kind set in
the bottom. The air seems cooler and damper here than in other places so far.
Most remarkably, lying in the pit there seems to be a battered-looking boat,
large enough for 6 men.
This room is in fact the far end of a remarkable underground canal, which is
being used to send troops against the dwarfs. There is a concealed door in the
wall that leads to a room which controls the water, which flows up (and drains
down) via the trapdoor. When the pit is flooded, the doors at the end (which are
in fact lock gates) can open, and the dock can receive vessels. Why isn't it
always open? Well that would make it too easy for the warriors.
There are BLx2 Black Orcs in the pit, and the warriors must defeat them to win.
Once done, it is a good idea to get them to search the room. It is highly likely
that the average warrior, when presented with levers, will pull them all to see
what happens. If he should open the doors without filling the pit, the rush of
water will certainly destroy the boat. For this reason, the warriors would be
wise to take a dwarf or mechanically minded individual with them.
If there is no one of this description, then the warriors will return to the
Hammerhall clan to report their success and findings. They can do this anyway,
and would probably be wise to.
The clan leaders are pleased with your results, but are intrigued by the
description of the room at the end. To that end, the warriors are dispatched to
escort a few engineers to the chamber.
After an hour of study, the engineers find a secret chamber. It contains several
crates, holding food and supplies, as well as four Objective Treasures, which
are given to the warriors. Also there is a system for controlling the complex
machinery of the room. As the warriors watch, the pit fills with water, floating
the boat up to their level. With a shudder, the two doors swing open, revealing
an underground river, heading off into the black.
The warriors must take the boat and travel down the underground river. They must
roll 1D3+3 times on the River Events table found in the appendix to represent
the events of the journey.
Once they arrive at the terminus, they are actually many miles away, underneath a secret base in the Black Mountains. They must somehow reach the surface.
This Dungeon uses an event table found in the appendix. For normal or
Unexpected Events, use this, rather than drawing a card. Unexpected Events occur
on a roll of 1 as normal.
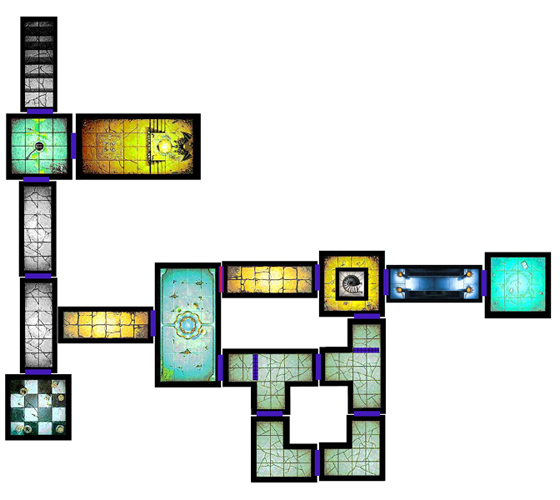
The first tile is the stairs.
The river comes to an abrupt halt, as it disappears through a metal grate. You
notice a small alcove in the side, and row towards it, mooring the boat and
heading up a set of stairs.
The warriors must fight through the dungeon to try and reach the surface, where
they can report back to the Hammerhall clan.
This room is damp and cold. The walls have strange markings, which appear
to mark the levels that the water has reached over the years. A large drain sits
in the centre of the room, no doubt to drain away any excess floodwater.
The warriors should generate an event for this room as normal. There is
nothing here but two doors.
One has the following poem engraved;
"If you fear the water
If your boat might leak
Come make a plea
At Hashut's knee
And maybe you'll find
The victory you seek."
This door leads to the Idol Chamber
It seems that this room has been used to make sacrifices. Many of the
bodies are of orcs and goblins, heaped up and withering near the flaming
brazier. As well as bodies, it seems that someone has left offerings of gold…
The only problem is, they are planning to defend it!
Roll on the event table until you have two groups of monsters. In other
words, ignore traps etc. The warriors must fight these monsters. Once the battle
is over, they can claim one Objective Room Treasure and 1D3 Treasure Cards, as
well as 1D6x30 gold each.
This corridor seems to lead upwards
Nothing except Unexpected Events will occur here.
This corridor continues to lead upwards. There is a door at the end, as
well as one halfway along.
Nothing except Unexpected Events will occur here.
This room smells pretty bad. Barrels of cheap ale and filthy rags make up
the furniture, and the inhabitant is sleeping off the ale, lying in the rags. As
the warriors enter, it stirs.
There is (roll 1D3)
| 1 | A Stone Troll |
| 2 | A Minotaur Champion |
| 3 | A Bull Centaur Champion |
The beast will attack as normal in the Monster Phase. However, it is suffering a hangover, and has only a single Attack, but the effects of the ale give it Ignore Pain 3. After the first Monster Phase it overcomes its Attack penalty.
This corridor levels out. It may take some time to reach the surface.
Nothing except Unexpected Events will occur here.
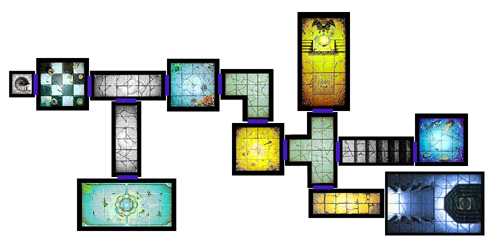
As the warriors enter the room, a number of monsters turn and look,
freeing their weapons and moving to attack. Behind the monsters, the warriors
can see a Chaos Dwarf. He shouts something to his troops and turns to leave,
closing a large door behind him.
The warriors must face 2D6 Hobgoblins, 1D6 Chaos Dwarf Blunderbusses, 2D6
Chaos Dwarfs and 1D6 Minotaurs. The warriors may take a treasure card each at
the end of the battle, and are faced with two doors. The north door, which the
Chaos Dwarf disappeared through, is heavily bolted and locked, and resists all
lockpicks and such. If the warriors attempt to bash it down, cast an immediate
Chaos Dwarf spell, and again every time they try it.
The other door features the following rhyme
"If you are the type of force
That need not sit upon a horse
Or if you are smarter than
Any elf, or dwarf or man
Then take this route, if not, beware
For you venture into Ghazhaan's lair
You might be mighty, he doesn't care
He'll win the game, so do you dare?"
This door is unlocked. It is the only way the warriors can really go.
The corridor beyond the door branches to the right, giving two options.
Once the warriors are all past the first four squares, a portcullis drops
behind them, followed by a stone slab. The warriors must go on.
This corner is featureless.
Nothing except Unexpected Events will occur here.
There is nothing here.
Nothing except Unexpected Events will occur here.
This T-Junction is blocked off by another portcullis, and a stone slab. As the warriors examine the blockage, a hollow laughter begins to echo around, and a deep voice speaks, reverberating the stones themselves.
| "The Wizard screwed up his face in concentration, as
he delved into the shielded magical ties holding the rocks together, and
keeping them moving inexorably on. A curious set of spells- not quite
the twisted logic of the Chaos Dwarf Sorcerers or the random power of
the servants of the Chaos Gods, but something in-between… A cry of triumph came from the ranger next to him, who was doing the same job of magically examining the block. Sarithi risked a glimpse, and saw the mage's onslaught of magic corroding the spells holding it together, as the mighty runeaxe of Grannath the Giantslayer split it apart physically. In a split second he felt the malevolent presence of the chaos dwarf, and his strange, powerful magic, and he shivered, before applying his own magic to the rock." |
"You should have heeded the warnings, foolish warriors! Now you are
caught in my Trap Loop, and I don't see how you are going to escape… But I
look forward to laughing at your pathetic attempts."
As the warriors listen, a deep rumbling shakes the very walls and floors. The
doors swing open, and the doorposts seem to shrink into the wall, pulled there
by unseen machinery. Seconds later, the warriors are in a smooth loop of
corridor, with no real features other than the two blocked passageways. The
rumbling dies down, then begins again as both stone blocks rise up, leaving the
two portcullises'. Beyond these barriers stand ranks of Chaos Dwarfs and
hobgoblins, readying their weapons.
Place any of the remaining tiles in the loop (which is the two Corners and
the two T-Junctions). In the four squares behind the portcullises, place two
Chaos Dwarf Blunderbusses and two Hobgoblins armed with spears. Do the same for
both places. These will attack any warrior in range, though only missile weapons
can attack them, at -1BS because of the portcullis. The warriors will probably
retreat out of LoS. If so, or if they kill the enemy, read the following.
The laughter begins again. "Very well! I'll have to send some of my
servants in to find you!" Both portcullises rise, and two large stone
blocks move slowly out, filling the entire corridor. The blocks move slowly, but
inexorably, and will soon crush the warriors between them.
You can represent the Stone Blocks by using either the Cave-In tile or two
other 2x2 tiles flipped over.
The blocks move 1 square per turn, and start out in the four squares behind the
portcullises. If the warriors are divided up, it is possible that the others can
go behind and escape, but that would lead to the others probably being squashed.
Let the warriors try various things, and allow them to succeed. Any wizard can
try to disrupt the magical power propelling the blocks. If he spends his entire
turn not doing anything, he can stop one of the blocks moving. If the warriors
try to smash through, the blocks have 45 wounds. Once at 0 wounds, they fly
apart under the intense magic, and the warriors have managed it. No Unexpected
Events will occur while the warriors are dealing with either the blocks or the
Blunderbusses and hobgoblins.
If the warriors manage to destroy one or more blocks, they can escape. The other
block will not move from the loop squares.
The voice begins to speak, as the warriors clamber over the rubble.
"Well, you have done better than the others. I will leave you now, to
struggle back to your puny civilisation, but we will meet again soon, and I look
forward to that day…"
Use the Torture Chamber, with either the 'Into the Dark' staircase or the
Staircase Tile in the centre
A large staircase descends into the earth. As the warriors enter, the leader
of the Chaos Dwarfs turns to face them, grinning horribly. With a shock, the
warriors see that behind him stand four dæmons, one for each of the Chaos Gods.
The Dwarf and dæmons disappear down the stairs, leaving 1D3+3 Hobgoblins
guarding the escape. The warriors draw their weapons and attack.
The Hobgoblins do not make an Ambush attack.
The warriors would be wise to continue on into the dungeon, as a magical shield
springs up to protect the retreating dæmons.
Use the bridge from the Catacombs of Terror, or a normal corridor
Far below the warriors can see and hear the water of the underground river-
they have clearly risen further than they thought.
Nothing except Unexpected Events will occur here.
This chamber is some form of control room. A large set of levers dominates
the room on the far wall.
The Warriors must make an Initiative Test to use the levers (Difficulty 8,
normal 'Mechanical' modifiers) to raise the chamber, taking them to the surface
and out.
>From there it is two weeks travel to the nearest town, and seven to the
nearest city. If they travel to a village (one week) then they cannot speak to
the Hammerhall representative. Otherwise, they can. The Hammerhall
representative (Ferrune Hammerhall) listens to their story, and gives them a
Treasure Card each or 2D6x50 gold (each warrior may choose which, but must do so
before rolling for gold or drawing the card).
Ferrune tells the warriors his theory of the enemy leader.
"Many years ago, a large force of greenskins from a newly formed tribe
attacked one of our small mining colonies. They were well organised, and managed
to reach the inner area of the strongroom, where they stole several items.
However, the miners fought back, and only a small force escaped. However, they
stole several of our children. Naturally, we did all we could to recover them,
but we never even found the bodies. A force of our warriors tracked the
greenskins to their base, but before we could organise anything, the base was
attacked by our accursed cousins, who took the remaining greenskins as slaves.
They collapsed their tunnels and we could not follow. The chase was over- but we
never knew the fate of the young ones.
Rumours have now reached us of a powerful dwarf warrior who has aligned himself
with the Chaos Dwarfs- but also has some deal with a congress of the Chaos Gods.
This is no doubt where he got the four dæmons. My tribe believes that a truce
has been established between the Chaos Gods, no doubt temporary, but if this
corrupted dwarf is involved, it suggests that we are all threatened.
We ask you to venture into the lower levels of the base. You will be rewarded,
of course, and receive great honour. There are many mysteries here, and many
things to resolve. Be on the look out for tablets of steel- they were the most
valuable item stolen from my clan by the greenskins, and were never
recovered."
If the warriors ask Ferrune about the 'Tablets of Steel' he will reply
"All I know is that they were a system of records, with ancient runes.
My clan has treasured the tablets for many years, and their loss was a great
embarrassment, even though we could never read them. I believe that we know have
the skills to decipher them, if only we could recover them."
Ferrune gives the warriors an ornate key, on the understanding that it will
be returned swiftly! It should destroy the shield preventing the warriors from
going further down.
This is very much like a normal dungeon, and is played as such, with events in each of the rooms and Unexpected Events as normal. Roll for two groups of monsters in the Fountain and Idol rooms.
| "The warriors fought desperately for each step,
slowly but surely advancing towards the throne of the corrupted dwarf,
who smiled as if amused by the slaughter. The Elven Ranger, Archellan,
was doing his best to combat the sorcery that the dwarf used, a strange
mix of Chaos Dwarf magic and the spells of the Chaos Gods. The barbarian
Roran swung his axe, decapitating the plague-ridden Dæmon of Nurgle,
while at his back fought the horribly scarred Giantslayer, who, ignoring
his wounds, sang his deathsong. The fourth warrior lay at Grannath's
feet, his fragile body torn by the claws of the Horror, which he had
struck down, only to have it reform into two smaller versions, and
strike at his back. Sarithi the Wizard was still, and the other warriors
could spare no time to see if he was dead. The dwarf atop the throne began to laugh, the same laugh that had tormented them as they had desperately smashed at the stone blocks, except this situation was far more desperate" |
The door of this room features another of the (rather ghastly) poems, this
one proclaiming that the warriors have reached their destination.
"Here is Ghazhaan, to face them all
If friend he will welcome
If foe, he will maul
Of those that enter Ghazhaan's hall
Only some leave walking tall"
The corrupted dwarf, Ghazhaan the Twisted, is seated on the throne at the top of
the steps. He will cast one spell per turn from the list in the appendix, but
will otherwise not participate. As soon as a warrior comes into base contact, he
will use flashpowder to blind them, and will open a warp gate, passing through
to escape the warriors. The portal will close immediately.
Ghazhaan is guarded by a Dæmonette, a Pink Horror, a Plaguebearer and a
Bloodletter. These are the envoys sent by the Chaos Gods- and they are the
guarantee of the deal between the Chaos Gods and the dwarf. When (if) the
warriors kill them, it will cause the Chaos gods to withdraw their support.
Also in the Throne Room are 1D6+2 Blunderbusses, 1D6+3 Chaos Dwarf Warriors and
a Chaos Dwarf Sorcerer.
Once the battle is over, the warriors can examine the area. They find the
long-missing Tablets of Steel, along with an Objective Treasure each and various
pieces of loot, worth 4D6x50 gold altogether, to be divided equally.
The warriors must decide what to do next. They know much more about Ghazhaan
than before, and they also have the Tablets, which means that heading for the
Hammerhall clan is wise.
Ferrune studies the Tablets briefly.
"Indeed, it is as I suspected. We of the Hammerhall clan have
rediscovered much of the ancient lore in recent years, and I believe that we may
now be able to understand this ancient record. I am not skilled in the art, but
I can see that it is a record of the old settlements in the north, places long
ago lost to chaos. Perhaps that traitor intends to plunder them- though there
will be little left after so long.
It is a great shame that he escaped, but at least he no longer has the
records. I have been authorised to offer you some items of value, as payment for
the Tablets."
Ferrune offers the party the Orb of Nullification and the Circlet of Might (see
the appendix), as well as 1D3 random runestones, from the common rune table. Any
dwarfs may also make a roll for a Master Rune, and if they are successful, gain
it for free! Normal rune restrictions apply.
"I bid you farewell, warriors, and good luck. Ghazhaan is still at
large, and though you have foiled his plans, and broken his alliance with Chaos,
he is still powerful, and will want revenge."
Of course, the warriors can hang around for a bit, to see what the Hammerhalls make of the Steel Tablets. If they do, I fear you may well have to wait around for the sequel!
Ghazhaan uses the following spell list. Roll 2D6.
| 2-3 | Failure. He doesn't cast a spell this turn. |
| 4 | Doomroar As normal |
| 5 | Rings of Defiance The sorcerer gestures at one of his minions, and it is surrounded by a nimbus of blue flames, protecting it. Select the monster with the least wounds engaged in hand to hand combat. It gains Ignore Pain (Dungeon Level) for one whole turn. |
| 6 | Flames of Punishment Make a note of each monster that is killed in the next warrior phase. As soon as it dies, a sudden explosion hits all adjacent warriors, causing 1D6+BL wounds, modified as usual. |
| 7 | Flames of Azgorh As normal |
| 8 | Hail of Pain A whirling cloud of lead bullets appear around the sorcerer's head. Any warrior ending its turn standing next to the sorcerer suffers 1D6 strength 6 attacks, using the sorcerers WS and damage dice. The sorcerer must forego casting 1 spell each turn that he maintains this. |
| 9 | Lava Storm As normal |
| 10 | Transformation of Kadon Roll 1D6 to see what the Sorcerer becomes- 1= Lammasu, 2-3= Great Taurus, 4-6= Bull Centaur Champion. Other rules as normal. |
| 11 | Warp Whirligig If the sorcerer is in hand to hand combat he teleports out of combat, swapping places with an unengaged model. If he is not, remove all of the models from the board apart from the sorcerer and warriors and replace them according to the one-on-one rule. |
| 12 | Dark Vortex Unknown forces tear through reality. All of the warriors are blown out of the room, while the monsters stay where they were. The warriors must re-enter. |
Note that the Orb of Nullification has an additional use. When Ghazhaan tries
to cast Warp Whirligig or Dark Vortex, read the following.
"The evil dwarf intones some syllables, summoning the winds of magic to
open up a warp gate. However, the Orb of Nullification seems to pulse with white
energy, and the dwarf's spell shrivels and dissipates."
Thus, count rolls of 11-12 as 'Failed' as well as 1-2.
Admittedly this is of no use to the warriors until the second part of the
adventure, but it should help them when they come into contact again. The Orb
basically has the power to suppress teleportation magic, meaning that Ghazhaan
also cannot escape.
Hazhars are fanatical priests of Hashut. They are easily distinguished from other Chaos dwarfs by their appearance; they have straggly, unkempt beards and wear loose, open robes or go naked from the waist up, revealing the tattoo or branding which all Hazhars have on their chest. Hazhars scorn the practise of wearing hats, which in Chaos Dwarf society are a symbol of status, since they believe that Hashut specially favours them, and their chest markings indicate this. They also claim that these markings have magical significance and offer them protection from hostile spells. Hazhars assist the sorcerer-priests of Hashut in their rituals. In battle they work themselves into a frenzy, whirling and leaping frantically so that they move across the battlefield more swiftly than other Chaos Dwarfs and fall upon their enemies, slashing and hacking with ornately curved daggers.
| Hazhar | |
| W | 8 |
| M | 3 |
| WS | 5 |
| BS | - |
| S | 3 |
| T | 4 (5) |
| I | 3 |
| A | 2 |
| Armour | - |
| Damage | 1D6 |
| Gold | 200 |
Special Rules: Magic Resistance 5+; Frenzy 3+; Ignore Blow 6+; Ignore Pain 1
The River Events table details the journey of the warriors through the
subterranean canal.
Roll a D66 to see what befalls the warriors
| D66 roll | River Event |
| 11-13 | The Warriors must dodge falling rocks. Roll an Initiative Test. On a 7+ they dodge, otherwise take 2D6 unmodified wounds. |
| 14-16 | The boat scrapes to a halt. It has landed on a small beach. Without warning, the warriors find they must fight 1D6+4 Wild Cave Squigs, who have Ambush, Magic A. No treasure. |
| 21-23 | The boat springs a leak. The warriors must discard either 1 bandage or a piece of stonebread to block the hole, or one random warrior loses a piece of treasure before blocking it with a hand (or making the dwarf sit on it). |
| 24-26 | Ambush! 2D6 orc archers gain 1D3 free shots each, before the warriors row across. Place a corridor with the warriors on one side, and then place the orcs in the remaining places. No treasure. |
| 31-33 | The warriors come across a dying dwarf prospector. He hands them the key to the portcullis before going into the corner to expire quietly. |
| 34-36 | Uneventful period. Row, row, row your boat… |
| 41-43 | Ambush! 2D6 Skeletons make an Ambush, Magic A. See 24-26 for placement. |
| 44-46 | The warriors encounter rapids. Roll Initiative Tests at 7+. If more fail than succeed, the boat hits rocks, and sinks without a trace. The warriors must fight through a random dungeon to get back on track at the start of Mission 2. |
| 51-53 | Ambush! Roll on the Monster Table below. These beasts have Ambush 4+. Use a Dungeon Room. There is treasure available. |
| 54-56 | Uneventful Period. Three Men in a Boat (to say nothing of the Elf)? |
| 61-63 | The warriors hit a fast bit (or current, if you want to be technical). Reduce the travel time by 1D6. Ignore this if it comes up again. |
| 64-66 | The warriors lose an oar. Add 1D6 to the travel time. Ignore this if it comes up again. |
This table is used to determine Events in the dungeon.
| Roll a D66 | Event | Treasure? | Generate other event? |
| 11-13 | Spear Trap 2D6+4 wounds on 1 warrior, modified as normal. |
No | On a roll of 1-3 on 1D6 |
| 14-16 | Ambush Magic A 2D6+3 Hobgoblins |
Yes | No |
| 21-23 | Encounter Injured Warrior. He will warn the warriors of a nearby trap. They can dodge the next trap or cancel the next ambush skill on an Initiative test (using leaders Initiative) difficulty 8. |
No | On a roll of 1-3 on 1D6 |
| 24-26 | Hands of Stone Trap 1D3 random warriors are held in place- cannot move until pass a Strength Test (7+) |
No | Yes |
| 31-33 | Lava Spurt Trap 3D6 Wounds, unmodified on 1 warrior, and 1D6 on each adjacent model. |
No | On a roll of 1-3 on 1D6 |
| 34-36 | Fireballs While in the room, one fireball per turn attacks a random warrior, doing 2D6+4 damage. |
No | No |
| 41-43 | Lava Pit Trap One warrior takes 5D6 Wounds, modified, and must be pulled out of pit by adjacent warrior with rope. |
No | No |
| 44-46 | Sleep Gas Trap Affects 1D3 warriors. Each makes an Initiative Test (7+) to avoid, otherwise sleep for 1D6 turns. Hit automatically, etc. |
No | On a roll of 1-3 on 1D6 |
| 51-53 | Earthquake Trap Roll Initiative Test (7+) for each warrior. If they fail they cannot move this turn. |
No | Yes |
| 54-56 | Encounter Slave. He has escaped from the Chaos Dwarfs. He has the stats of a BL 1 Elf, armed with a mace. He must make a Willpower Test (difficulty 7) to fight each turn. If he rolls a 1, he runs away. He doesn't generate extra monsters and isn't targeted by spells and traps. |
No | On a roll of 1-3 on 1D6 |
| 61-63 | Ambush Magic A Chaos Dwarf Sorcerer and 1D6+3 Chaos Dwarfs |
Yes | No |
| 64-66 | Pit Trap One warrior falls, taking 1D6 unmodified wounds. Need a rope to escape. |
No | On a roll of 1-3 on 1D6 |
This table is used to determine Monsters.
| Roll a D66 | Monsters |
| 11 | Roll twice on this table |
| 12 | 2D6 Hobgoblins mounted on War Boars |
| 13 | 1D6+6 Chaos Dwarf Blunderbusses |
| 14 | A Bull Centaur Champion and 1D6 Bull Centaurs |
| 15 | 2D6 Hobgoblins and a Bull Centaur |
| 16 | A Chaos Dwarf Sorcerer and 1D3 Chaos Dwarf Champions |
| 21 | 1D6 Minotaurs |
| 22 | 1D6 Hobgoblins and 1D6 Chaos Dwarfs |
| 23 | 1D6 Chaos Dwarf Blunderbusses and 1D3 Bull Centaurs |
| 24 | 1D6 Hazhars and 1D6 Chaos Dwarfs |
| 25 | 2D6 Chaos Dwarfs |
| 26 | 1 Chaos Dwarf Sorcerer and 1D6 Chaos Dwarf Champions |
| 31 | 1D3 Chaos Dwarf Champions mounted on Bull Centaurs |
| 32 | 1D6 Bloodletters |
| 33 | 1D6 Hobgoblins mounted on War Boars |
| 34 | 1 Great Taurus |
| 35 | 1 Lamassu |
| 36 | 2D6 Chaos Dwarfs |
| 41 | 1D6 Minotaurs |
| 42 | Chaos Dwarf Champion and 2D6 Chaos Dwarfs |
| 43 | 1D6 Plaguebearers |
| 44 | 1D3 Chaos Dwarf Champions |
| 45 | 1D6 Bull Centaurs and 1D6 Chaos Dwarfs |
| 46 | 1D6 Bull Centaurs |
| 51 | 1D6 Pink Horrors |
| 52 | 1 Chaos Dwarf Lord and 1D3 Chaos Dwarf Champions |
| 53 | 1D3 Chaos Dwarf Champions |
| 54 | 2D6 Hobgoblins mounted on War Boars |
| 55 | 1D6 Dæmonettes |
| 56 | 1 Chaos Dwarf Sorcerer Champion |
| 61 | 1D3 Chaos Dwarf Sorcerers |
| 62 | 2D6 Hobgoblins |
| 63 | 1D6+3 Hazhars |
| 64 | 1D6 Chaos Dwarfs and 1D6 Chaos Dwarf Blunderbusses |
| 65 | 1D3 Bull Centaur Champions and 1D6 Hobgoblins |
| 66 | Roll twice on this table |
This item can be used to dampen local energy fields. The bearer receives
Magic Resistance 6+, or +1 to their Magic Resistance roll. It can also be used
once per adventure to cancel all of the magic in the area, friendly or enemy.
1000 gold, Wizard only
When worn, the Circlet gives the wearer +1D6 Strength for one turn per
adventure. However, if that roll was a natural 1, the warrior is immobilised,
and cannot make any actions at all.
400 gold, any warrior
The idea of the canal was originally going to be an underground train system,
but it was difficult to see an objective room that I could use. The best I had
was replacing the tomb in the tomb chamber with a carriage. I was intending to
include rather surreal elements, like an Ogre ticket collector, so it's probably
best that it turned into a canal.
The GM is a vital element in this, because much of the story is fairly
incidental, such as Ghazhann's history, and the players are bound to miss the
implications of the Dæmons, and things like that which might be quite
important. To be brutally honest, most of the story doesn't really matter if
they aren't going to complete the campaign, the second part of which you can
expect later on (with any luck!).
It's often good to put in my personal disclaimer, which is that this is highly
unlikely to be balanced, or anything like, because I seldom have the chance to
playtest these things.
Incidentally, thanks go to a number of people, including Bruno for hosting this,
BassJam for inadvertently giving me some ideas, and the King of Turves for his
helpful input, which channelled my thoughts in an unexpected direction. More
importantly, my thanks go to whoever created the Hazhars. Please get in touch so
I can credit you properly.
What's next? Well, I have to finish the rest of this adventure. See below for a
preview. I am also putting the finishing touches to the Jester character, a man
for whom life is no joking matter, and I may try and come up with an adventure
with either the Jester or the Sister of Sigmar in.
Please contact me for any comments you have, especially if you have playtested
something, and have formed opinions.
Peter Haresnape 31st July, 2003.
"Bigger Tables! Better Choices! More Rules! "
"The only sound that the barbarian could hear was the howling of the
icy wind, throwing pebble-sized chunks of ice around like the toys of an angry
child. Despite the bitter cold, perhaps because of it, the barbarian smiled,
remembering his youth. He has been angry most of the time, causing his father to
nickname him 'Infant Berserker'. It had been cold then, too, but the memories
were all warm, wrapped up as snugly as-
The barbarians' thoughts, which were becoming alarmingly sentimental, were cut
into by the dry coughing; just about the only other sound he could hear. He
tugged on the harness of his mount, Hrothann, and trudged towards the nearest
overhang, a precarious ice shelf, affording some shelter from the wind.
Inside the small covered wagon, the wizard broke out into another coughing
spell. Archellan knelt over him, loosening his tightly bundled furs so that the
patient could breathe. Beside him, another fur-clad form mixed a salve in the
flickering light of the lantern.
A blast of cold wind signalled Roran's arrival. The barbarian looked in from
time to time, but it was becoming more frequent as they got closer to the black
mountain towering before them. The second form shifted to look at him, and the
barbarian was jolted again by the pale beauty of that face. Shiana O'Rhea was
one of the Sisters of Sigmar. She had agreed to accompany them for the wizard's
sake, but her skills had so far been useless to break the wizard's fever.
"He is no better?" Neither the ranger nor the Sister wanted to answer
the barbarian, but after a long moment, she shook her head, and turned to stoke
the small stove. Roran sighed, and leaned over to glimpse the face of his wizard
comrade.
"I think we'll be there soon. We will press on, try to break through the
storm?"
The ranger nodded mutely. As the barbarian slipped back out and the wagon
started moving again, he wondered bleakly why they had volunteered for this
mission. He knew why he had- his beloved's face comforted and supported him at
the worst of times. But why the barbarian? And why this Sister of Sigmar, who
had never exchanged a coherent sentence with her patient? His thoughts turned
again to the Giantslayer, whose brash and simple view of the world had given him
moments where he had doubted the accumulated wisdom of elf kind.
Outside the wind was picking up again, and the ranger turned again to the
rituals of healing magic, helping the tattered body of the wizard to slowly fix
itself. He was gripped with a sudden determination when he looked at the shaking
body. He would finish this! Ghazhaan would be stopped- or Sarithi's suffering
would be in vain.
The barbarian grinned as he trudged through the snow, coaxing the horse behind
him. A sudden mood of optimism lightened his burden, perhaps at the sight of the
mountain, ever closer. The wind began to drop, and for a brief moment, the sun
broke through the clouds.
"Ghazhaan had better watch out…"
Stay tuned for part two of the Dark Dwarf!